Paper-based technology
Practical Action
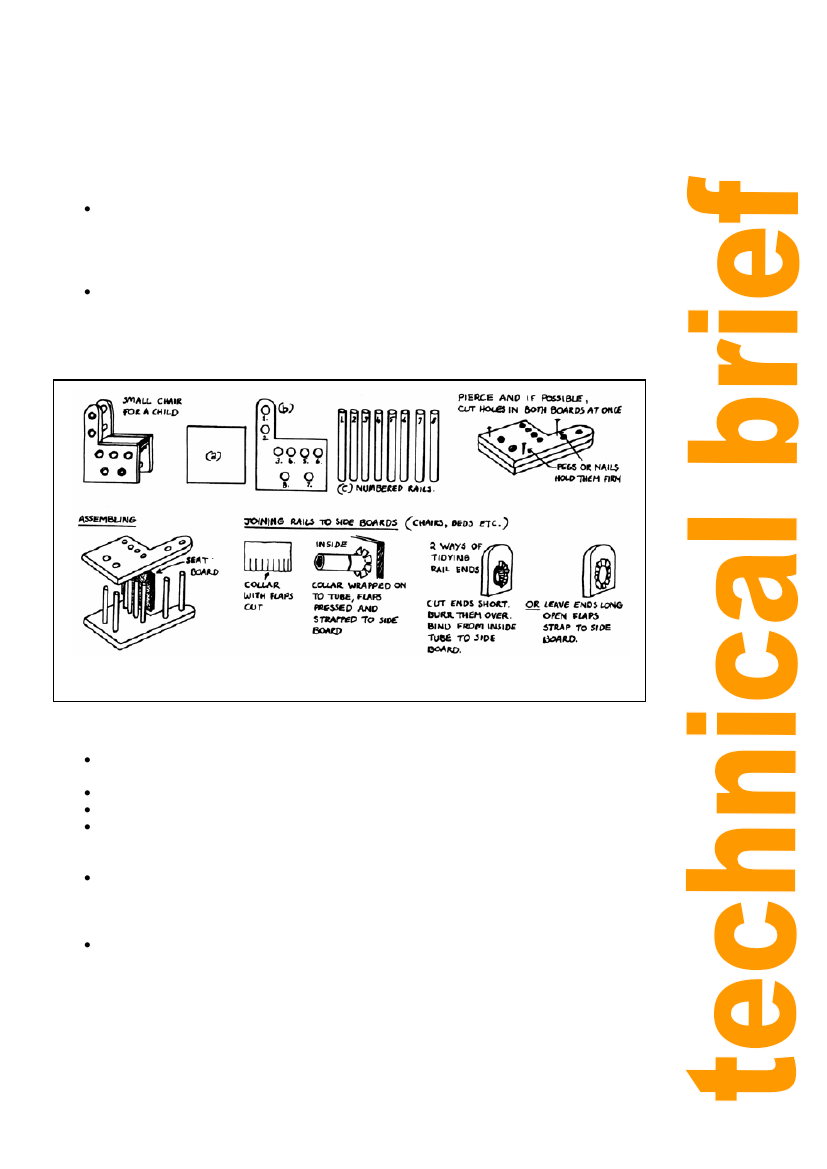
Stage 1: Building the chair
Add to your working kit:
A hole-cutting tool (such as a flattened five-inch nail and stone hammer); a piercing tool (a
smaller sharpened nail in a holder); a piece of rusty piping (to use as a rasp); and some string.
You need to know:
How to layer paper or thin card. Pieces of paper are pasted (and thus stretched) and
applied with hand pressure to an article. They must lie quite flat and may have to be
lifted, torn, and relaid. They may be applied one, two, or three layers thick, and may be
referred to as ―strapping‖, ―binding‖, ―strengthening‖, or ―tidying‖, according to the job they
do.
How to cut holes for tubes. Holes can be rough but must hold the tube tightly without
crushing it. Their sides should be perpendicular. Use a chisel-like tool to cut them.
Enlarge or tidy them with the piece of piping. Match each hole to its tube and number
them both.
Figure 3: A railed chair - Utility approach two
Get to work:
Tidy all board edges and make the two sideboards identical by rubbing on a concrete
surface, with or without paste. Bind the edges.
Cut the holes. Test-fit and number the tubes.
Do a mock assembly (i.e. without paste).
Lay one sideboard on the table and fit the tubes into their holes. Hold the other sideboard
in position over the tubes and guide, press, and screw each tube into its hole. Place the
seatboard in position then press the sideboard hard down against the seatboard.
Stand the chair upright and manipulate the rails so that their ends project evenly about
5mm through one sideboard. (Trim the other ends later on.) Square up everything,
checking particularly that the distance between the sideboards is everywhere the same
and that the chair stands upright, then disassemble the chair.
Paste all joining pieces, rail ends, and holes, and reassemble the chair. Pierce holes
through the seatboard and tie it firmly down to at least one rail. Trim the remaining rail-
ends to project 3 to 5mm. Burr all rail ends over with a suitably shaped stone, cutting
into them if necessary. They should lie flat like rivets. Stand the chair up, and after
squaring up leave it to dry with a weighted board across the seat.
Stage 2: Strengthening and tidying
First: Add some magazine paper to your working space.
5